Welcome to DC Bees and our first blog post – on Beekeeping Equipment! It is December, so unless you are lucky enough to live in the tropics, you aren’t doing too much with your bees. You will go out and do periodic checks, and perhaps feed them, but you don’t want to open the hives that often, especially when it is cold. The winter is when most beekeepers are building hive boxes, preparing frames, or getting equipment ready for the next season…or drinking beer. So this post is all about getting your beekeeping equipment arsenal ready for summer.

So I’m tackling the beekeeping equipment front and building a double boiler, (which I will use for the drinking beer portion of activities in the future).
If you have more than a few hives and are lucky enough to have begun bottling larger amounts of honey, you have thought about how sweet it would be to add to your beekeeping equipment arsenal a heated bottling and storage tank. Maxant Industries sells them, and I’m sure they kick ass, but they are flipping expensive. The smallest one listed is a 16-gallon version for $1,000…not including shipping. Yikes – You can build a lot of your beekeeping equipment yourself, and I think I’ll try to build one DIY style for a whole lot less.


If you are new to beekeeping, here are a few perks to having a DIY Double Boiler.
- Real honey crystallizes over time and solidifies. So if you store large amounts for any length of time, you often need to warm it up to melt it.
- Overheating will damage the natural properties and benefits of honey, so you don’t want to microwave it or directly heat it over the stove. That could scorch your honey.
- Warm honey is far easier to strain and bottle.
- It is easy and cheap (by comparison) to make! The DIY Double Boiler version I made was a little over $100 and was made in all of about 30 minutes. And that is because I had to take pictures…You could make it even cheaper too (read on…).
So, the high end bottling and storage tanks, similar to Maxant’s beekeeping equipment, are essentially double boilers with an internal heating element and some internal piping. Yea yea yea, theirs are stainless steel and have sight gauges etc., but you can do that too if you want…and for much cheaper.
Beekeeping Equipment – What You Will Need
- 2 Aluminum kettles. I bought a 52 quart and a 32 quart version at Winco for about $65. The great thing about using these kettles, is that the handles of the 32 quart fit over the outside of the 52 quart. This elevates the kettle and provides a space between the bottom of your inner jacket (small kettle), and your outer jacket (large kettle). That space is where your fittings and tubing will be (read on).
- ½” Stainless 2 piece valve
- ½” stainless hose barb
- Two ½” Stainless bulkhead fittings and o-rings (weldless versions)
- Two “female” ½” stainless hose barbs
- “Street 90” ½” coupling
- 2’ of Silicone Tubing (rated to transfer heated material…don’t go using tubing you found in the garage!).
- Step bit having a step at 13/16”
- Drill


All of the above items, except the drill and kettles, can be found on Bargain Fittings. Don’t waste your time looking for cheaper, as I already did all that. It is a great one stop shop. You should be able to get everything, including shipping for about $50.
The other stuff (kettles, step bit) can be bought at Winco or Amazon etc. If you don’t already have a drill, then go away and quit reading this – your internet surfing has lead you astray you couch potato – you are never going to build this or have beehives. (That last bit was a test to see who is still reading).
Building the Inner Jacket of your DIY Double Broiler
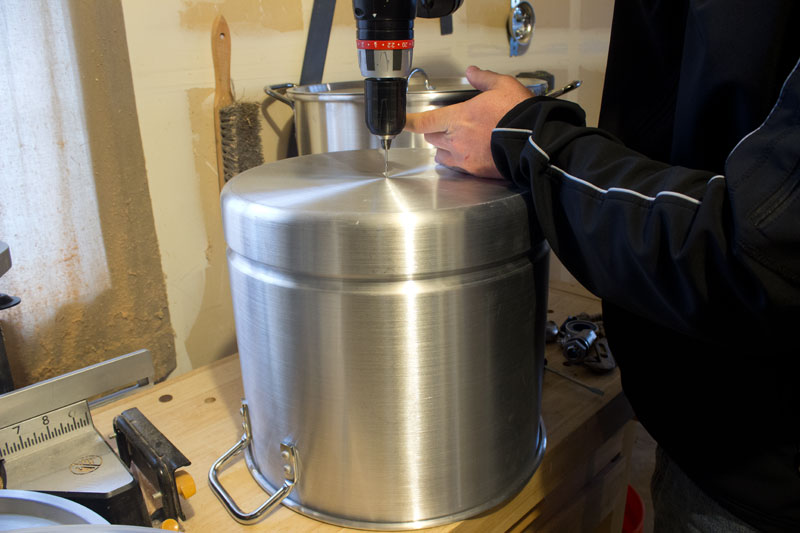
Step 1: Drill a Hole
Drill a small pilot hole into the bottom of the small kettle. Drill a pilot hole so you don’t botch it up trying to go right at it with the Step Drill. Just do it for crying out loud…


Step 2: Drill a Bigger Hole
Using your step bit, drill out the pilot hole just until your threaded bulkhead fittings screw in. Too large and you’ve screwed the pooch and you now have a nice pot with a big hole in it…
Step 3: Attach Bulkhead Fittings and Tubing
Ok, so really this is several steps…Insert your bulkhead fitting, apply plumbers tape to wherever you have threads, and screw on a “Street 90” fitting and a female ½” stainless hose barb and attach your temperature rated silicone tubing.


Step 4: Tighten Down Inner Locknut
Screw on the locknut with the o-ring on the inside of the kettle. Don’t forget the plumbers tape…I told you about that in Step 3, damn it! I’m finding that writing out steps in a blog is tedious…where did that beer go?
Step 5: Check for Leaks
Check that puppy for leaks. Fill the inner kettle up, I’ll wait. Hold the silicone tube that you connected in Step 3 up above the water line so the water doesn’t pour out though, you jackass. Ah, I found my beer, my mood should now be improving, but not my writing…It may correspondingly go to crap. Follow on at your own risk.

Building the Outer Jacket (AND CRITICAL STEP 8!)
Step 7: Do it (not quite) exactly again
Step 7 – You now are going to repeat the steps you completed for the inner jacket, except you are going to drill your pilot hole on the LOWER SIDE of your large kettle (outer jacket). This is where your valve will be placed and delicious warm honey will be pouring out. Don’t be that guy or gal who isn’t paying attention and completely repeats the prior steps and accidently drills a hole in the bottom vs. the side of the kettle. If you are, you were probably also the same person who was stuck on Step 6 with all the leaks. You spent all that time on Step 6 and here you are, screwing up Step 7. Are you sure this hobby is for you? You might want to stick to gardening (which is cool – I do that too), because I see all kinds of bee stings in your future. Connect the other end of the silicone tube to your inner hose barb fitting, once you put it on (just look at the picture will ya?)


Step 8: Critical to this project and many aspects of beekeeping
Ok, I’m back. I had to go and take a few more pictures of steps that I didn’t initially take. If you are still reading about the DIY Double Boiler, again, the actual assembly and completion of this beekeeping equipment is less than 30 minutes. If you want to write a blog post about it, you will trash the better part of a day. Drink a beer (that is all that is required for Step 8). Remember, if your better half gives you any grief about Step 8, you are only following directions. Step 8 is regarding that this is a hobby. Enjoy it, don’t stress over it. I know I gave a few of you grief about the leaks and all, but, take a breath, this is supposed to be enjoyable. If you don’t drink beer, or you make good relationship choices, immediately go to Step 9.
Step 9: You are done already, yet you are still reading this
If you attached the other end of the silicone tube correctly in step 7, then you are done. Your inner kettle just needs to be set down into the large one to where it rests on the handles (for Winco’s version anyway). If you don’t have the Winco set up, just figure it out. Hell, you could through a couple of bricks in the big kettle and the small one will sit on those just fine.
Fill up the the large kettle with some water, put some honey in the inner kettle and presto change-o you did it. If you got through all of the above steps, or perhaps had to repeat Step 8 a few times, the rest of the post will just be pictures and a bit more sarcasm. I’m done. I finished the daggone DIY Double Boiler hours ago and now I’m just trying to finish this post. I’m going to repeat the phrase “DIY Double Boiler” a few more times too, because that is supposed to help my internet search rankings. You should be able to fill this bad boy up with honey and go at it from a bottling standpoint. You can also leave the honey inside of the inner kettle for storage until it crystallizes, and then warm it up whenever you need it – kick ass says me. You can also use this puppy for a killer crawfish boil or some other event where you need to purchase Costco quantities of food…It is my day off so I’ve been repeating Step 8 for a good part of the day now, so I’m not sure if this post is even saving correctly.

Things I may have left out and more sarcasm
A few things I did leave out. This double boiler doesn’t have a heating element like the Maxant version. A couple of you astute folks out there may say something about that, and how that impacts the price. Well, you are correct. You can set my version on your home stove, or a turkey fryer gas stand and you are good to go. For those who need to factor that into the project, I went to Sears.Com website to see what high-end stoves are going for nowadays. You can get the Dacor Freestanding Dual Fuel Range, (pictured), for $10,999 (they shaved off that extra dollar for ya – enjoy it). So, depending on whether you have your own stove, or you have to add the Dacor Range to your plans, this beekeeping equipment project’s cost can range anywhere from around $100 to $11,099.

I hope you were able to complete your project and add to your beekeeping equipment inventory, I know my ASTM quality instructions on the build should have gotten you there, but if not, see Step 8 and keep working at it.
I would like to thank you for checking out DC Bees! Please like, share, tweet, or scrawl on your nearest bathroom wall about our website so that it can be shared with others! Keep checking out our site too, as we will be adding additional posts about DIY and backyard hobbyist activities. Not just about beekeeping equipment, but frankly whatever catches my interest at the time, such as gardening, hydroponics, woodworking etc. I’ll be using the above DIY Double Boiler (come on Google rankings!) to make beer, as well as mead in the not too distant future.
If you are interested in beekeeping, it is a tremendous and rewarding hobby. If you are in, or around central valley California, and are interested in learning more, contact us to get on our email list. I’ll share with you what I’ve learned in beekeeping, perhaps make some lip balm and share some of my hopefully palatable mead!